How do I retarget my Outbrain campaigns using Facebook?
Retargeting your Outbrain audience with Facebook Ads is an effective tactic for driving consumer action. Using the thorough guide below, we’ve made it easy to set up the integration.
Please note that these instructions are for importing Outbrain audiences into your Facebook Ads account. If you’d like to do the opposite and import your existing Facebook audiences into Outbrain, you’ll need to do so through our DMP partners.
We’ll take you through:
Placing the Facebook pixel on your site
Implementing the pixel in your Outbrain campaign
Creating the audience in Facebook
Placing the Facebook Pixel on Your Site
Log into your Facebook Ads Manager account and click “Create Audience.” Click the Settings wheel to view the pixel.
![]() Next, copy the pixel code.
Next, copy the pixel code.
![]() Paste the pixel code into your website header. Note: you will later need your unique account ID string, blocked out in orange above, to implement the pixel in your Outbrain campaign.
Paste the pixel code into your website header. Note: you will later need your unique account ID string, blocked out in orange above, to implement the pixel in your Outbrain campaign.
Implement the Event in Outbrain
Before linking the pixel to your Outbrain campaign, you will want to alter the name of the event so that Facebook can find it later. Make sure not to make this change in the pixel code on your site’s header, but only when implementing the event in your Outbrain campaign. The pixel on your site should remain as it was provided by Facebook.
The event is currently defined as “ev=PageView&noscript=1” in your Facebook pixel.
![]()
When renaming the event for Outbrain, you may choose to alter the code as follows:
ev=outbrain&noscript=1
This is what we’ve chosen to name it, but if you’ve chosen another name, make sure to replace “PageView” with what you’ve selected. To rename it, find the “src” portion of your pixel code, which looks like this:
https://www.facebook.com/tr?id=1234567890&ev=PageView&noscript=1
Change the event portion to its new name. In this case, we have named it “outbrain”, so the “src” URL string would read as follows:
https://www.facebook.com/tr?id=1234567890&ev=outbrain&noscript=1
Make sure to also replace the “1234567890” portion with your unique ID, as identified in the “src” string.
Next, head to your Amplify dashboard, open your Account Settings (can be found on the left-hand sidebar), and select the “3rd Party Pixels” box. Enter the modified pixel URL, then click Save at the bottom right-hand corner of the screen.

You can also add in these 3rd party tracking pixels while initially creating a campaign. This section is at the very bottom of the campaign creation process, and looks just like the screenshot above.
Create Facebook Audience
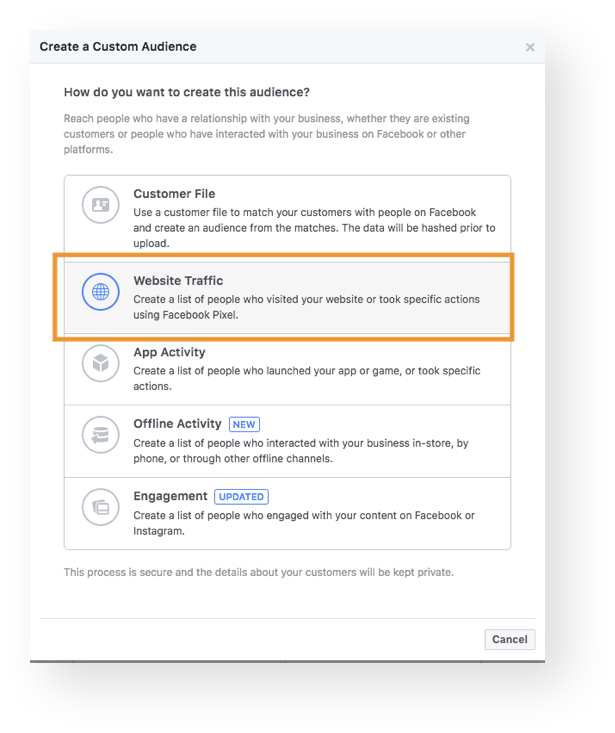
After the campaign has been active for a few days, create an audience in your Facebook dashboard by targeting the specific event. Head to your “Audiences” tab, then select “Custom Audience” from the “Create Audience” drop-down.

Next, select “Website Traffic” from the “How do you want to create this audience?” menu.
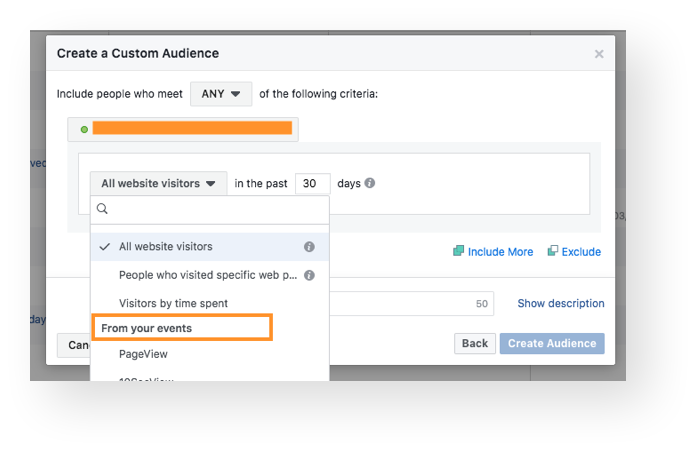
 Finally, click the “All website visitors” option to find your list of events. Scroll down until you see the specific event that you created, and select it.
 Click “Create Audience” to save your selection.
Key Takeaways
- We recommend using third-party pixels on Desktop Only campaigns to ensure that the pixel fires properly on the reader’s browser.
- Avoid capital letters or spaces when naming the event.
- Make sure the campaign is live and receiving traffic, since the event must be fired in order for Facebook to identify it.
If you have any questions or concerns about this, feel free to reach out to our DIY Customer Success team; we’re always happy to help!