How do I create a Click-to-Watch campaign?
Click-to-Watch is a video format that blends the power of video storytelling with the efficiency of native, allowing your customers to interact with your brand through an opt-in immersive video experience that drives meaningful engagement and concrete results.
Use Click-to-Watch to tell your brand story, showcase your products and services, and create a memorable brand experience thanks to a full screen, audio-on format for higher engagement and brand recall.
How to set up a Click-to-Watch campaign
To run a Click-to-Watch campaign, you will first need a VAST URL for the desired creative(s) you’d like to promote.
- I don’t have a VAST URL
Please reference this article about how to use the Outbrain Video Creative Studio. Once you’re done creating your VAST URLs, navigate back to this article to continue the rest of the campaign set-up.
If this is your first Click-to-Watch campaign, make sure to first check out the Click-to-Watch creative specs and best practices here.
- I already have a VAST URL
Creating a Click-to-Watch video campaign on Amplify follows a similar process as any other campaign, with a few extra steps.
For a quick tutorial, feel free to watch the video below, or continue reading for more information.
1. Create a new campaign and define settings
- Select “Create Campaign” in the top right-hand corner of the dashboard.
- Add your campaign name, and select a campaign objective based on your own KPIs. Click-to-Watch can run with any of the existing objectives.
- For a full explanation of campaign objectives, visit this article.
- Select “Click-to-Watch” in the Creative format section.

- Enter your CPC, your budget and all other corresponding campaign targeting options. If you need a refresher on setting up a campaign, visit the Campaign Set-up article.
*Please note: By default, each Click-to-Watch video campaign will have the 90% “Engaged-View” pixel assigned as a conversion event (this means a conversion is counted each time a user plays more than 90% of your video ad). In case the video conversion is not relevant for your campaign or if you’d like to set up a separate non-video conversion, you can turn it off at the marketer level in the “Manage Conversions” section.
- Click “Next: Content” on the bottom right-hand of the dashboard to add your creatives.
2. Add content to your Click-to-Watch video campaign
For a quick tutorial on how to upload video creatives to your Click-to-Watch campaign, watch the video below, or continue reading for more information.
- In the Content tab, select between adding a single video ad, or multiple variations. For easy creation of multiple ad variations (more than one video, image and title combination) use the “Variations” tab.

- Select your VAST from either:
- The creative list (where the VAST you built in Video Creative Studio is located), or
- By URL where you can simply enter an external VAST URL of your choice.
*Please note: In case you do not have the VAST URL available, please refer to this article to learn how to generate it through Amplify’s Video Creative Studio.
- When your VAST is selected, you will see a sample of snapshots from the video recommended to use as thumbnails. Choose which ones to keep and delete the ones you don’t want. Click on “Snap from video” to generate more thumbnails. You can also browse your local files to add image(s).
- Add ad titles, as well as your source name (brand name).
- If you’ve selected to upload ads through “Variations”, all titles entered will be combined with all Snapshots selected to create multiple variations. For instance, two titles and 3 pictures will create 6 combinations.
- Click “Add Content”.
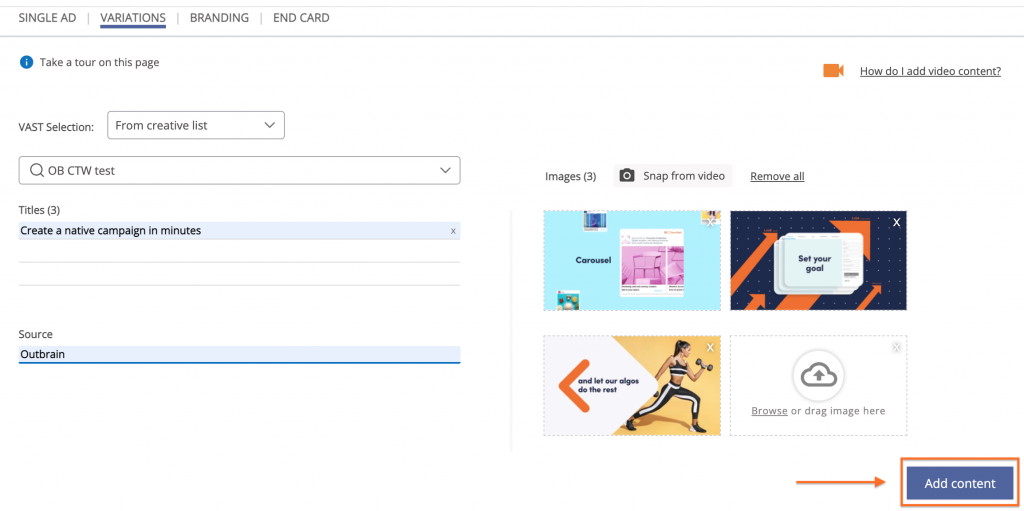
- You will see all the resulting ads in the bottom container. By hovering over different elements, you can edit the titles, source name or the image, and preview the ads by clicking on the play icon.

*Please note: Although only one video VAST can be used when creating a set of variations, you can repeat the same process with different videos by replacing the VAST after you’ve created a set, and then clicking “Add Content” again.
- Once your creatives have been set up, you have the option to add Branding* and End card. Adding these elements will allow you to create a fully branded experience, with a background, a logo and an extra CTA button. Please refer to this article in order to learn more.
*Branding elements are only supported on desktop targeted campaigns.
- If you don’t want to include an End card, navigate to the End card tab and select “No” in the “Show End Card” box. This will allow you to save the campaign.
What’s Next?
After ensuring you’re happy with the creatives, hit “Save” on the bottom right corner of the dashboard, and you’re all set to launch your Click-to-Watch campaign!
Reporting
Click-to-watch reporting includes the same stats as you’d normally review for your standard campaign content (such as spend, impressions, clicks, CTR, conversions,) with a few additional video metrics relevant for the Click-to-Watch format.
The additional available metrics can be selected in the reporting columns:
- Video Plays: Registered the moment a user opens the video and starts playing it
- View progress percentile: 25%, 50%, 75%
- Completion: Number of completed video views
- Average view duration: Total watch time of the video divided by the total number of video plays
- Clicks on video: Number of clicks on CTA, branded background CTA and End card elements
- Active Completions:Ttotal number of user actions (including click-throughs and video completions)
- Active Completions Percentage: Percentage of of times the user interacted with the video
Important Notes:
- Click-to-Watch ads cannot be mixed with other ad formats within the same campaign.
- Branding elements are supported only on Desktop devices.