10 Tips to Launch Your First Outbrain Campaign


So, you’ve decided to try native advertising. Awesome! Luckily for you, setting up your first campaign with Outbrain is quick and easy. Before you dive in, we have some important tips to help you maximize your campaign’s potential from the very beginning. Consider this your roadmap for a successful first launch with Outbrain.
1. It’s All About the Conversions
As a performance marketer, you’re naturally focused on hitting your conversion goals.
You should begin by implementing the Outbrain pixel on your site, which is the first step to setting up conversion tracking.
It is important to implement the tracking pixel across your entire website. This gives Outbrain’s algorithms the best, most comprehensive picture of user engagement with your ads, which will support accurate targeting.
You can use Google Tag Manager to install the Outbrain pixel. This is the easiest way, and we recommend it highly.
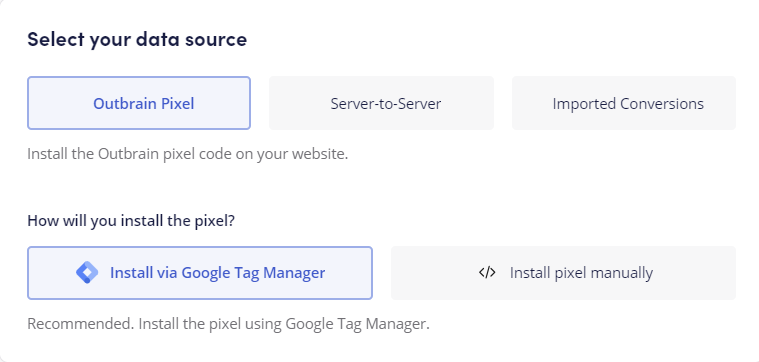
If you prefer to install manually, click the “Install Manually” button, copy the code, and paste it into your website’s header. If you use this method, you’ll need to enter most parameters directly into your pixel code.
When setting up your conversions, there are three types to choose from:
- URL-based Conversions, which track when a user lands on a specific URL, such as a purchase followed by an order confirmation page.
- Event-based Conversions, which track when a user completes a particular action not indicated by a specific URL, such as spending 30 seconds on your site.
- Codeless Conversion allows you to create event-based conversions from the Outbrain dashboard without touching on your website code. Simply put, this gives you the ability to just enter your website URL in the dashboard, and then identify and select buttons/CTAs for which you’d like to create event-based conversions. Then you’re done!
It’s helpful to map a variety of conversions that are both URL- and event-based, and are scattered throughout the funnel. The more data (and data variety) you have to work with, the better.
Take note that implementing the pixel and mapping conversions will also enable Outbrain’s powerful auto-optimization tool, Conversion Bid Strategy. More on that below.
2. Establish Your Bid Strategy from the Start
Outbrain offers two bid strategy tools that leverage smart algorithms to automatically optimize your campaigns toward your predefined goals throughout the funnel: Conversion Bid Strategy and Engagement Bid Strategy.
Conversion Bid Strategy (CBS)
When you choose “Sales”, “Leads”, or “App Installs” as your campaign’s main goal, you’ll be automatically opted into CBS. Rather than simply optimizing your campaign toward clicks, CBS automatically adjusts bidding in real-time toward top-converting inventory and audiences, all based on your specific goals. If you’re looking to drive lower funnel conversions while adhering to other benchmarks (such as ROAS or CPA), this is the perfect tool for you.
There are four modes for you to choose from when running campaigns on CBS – Max Conversions, Target CPA, Target ROAS (all fully automated and recommended), or Semi Manual (semi automated, for those who prefer to say adjust bids manually). To evaluate which CBS mode can work best for your Outbrain ad campaign, first define your campaign objective and primary KPI.
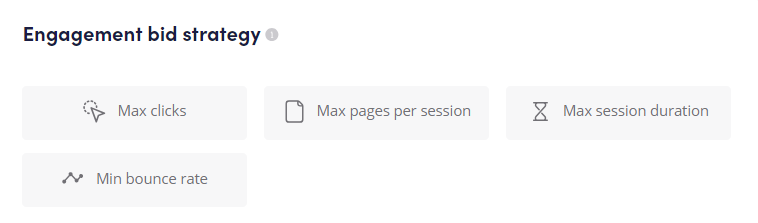
Engagement Bid Strategy (EBS)
When you choose “Traffic” as your main goal, you’ll automatically opt into EBS. This mid-funnel bid strategy utilizes machine learning technology while ingesting your first-party website analytics data to automatically optimize your campaign to reach your most attentive and engaged audiences, at the best cost.
There are currently four EBS modes:
- Max clicks: Generate as many clicks as possible given your allotted budget and CPC.
- Max pages per session: Optimize your campaign to maximize pages per session, based on your Google Analytics data.
- Max session duration: Optimize your campaign to maximize session duration, based on your Google Analytics data.
- Min bounce rate: Deliver your ads to the people least likely to leave your webpage without taking action, based on your Google Analytics data.
To activate these modes, you must integrate your Google Analytics account to start pulling in your first-party data. Once you select one of these EBS modes, the dashboard will provide steps to lead you through the integration process.
Both the CBS and EBS bid strategy tools take the heavy lifting off your shoulders, while driving long-term outcomes and prioritizing user privacy, thus reducing reliance on third-party cookies.
3. Separate Your Campaigns by Device

We strongly recommend splitting your campaigns by device for two key reasons.
First, CPCs vary by device, and creating separate campaigns will allow you to customize your bidding based on whether you’re serving on mobile, desktop, or tablet.
Second, we tend to see higher CTRs on mobile versus desktop. With this in mind, Outbrain’s algorithms may prioritize mobile traffic over desktop when both are included in the same campaign. Splitting up your campaigns by device will avoid this.
By evaluating your campaign performance in a device-specific manner, you’ll be able to allocate your budget more effectively, adjust your CPCs accordingly, and better elevate your performance, ultimately resulting in richer post-campaign insights.
4. Is Your Reach Broad Enough?
Always keep an eye on the Potential Reach Estimator on the right-hand side of your dashboard. This will give you a sense of how many users are within your audience based on the applied targeting. As a general guideline, most successful campaigns we see have a reach of several million.
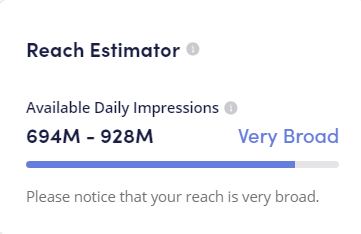
Please note that the more targeting types you add to your campaign, the narrower your reach will become, which can subsequently raise your CPCs and negatively impact results. That being said, fight the urge to layer on tons of audience targeting – it does more harm than good.
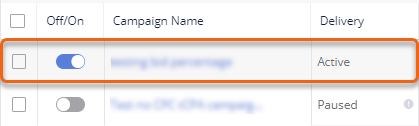
5. Create New Campaigns Rather than Adjusting Existing Ones
If you want to change up your audience targeting or test something new, try creating an entirely new campaign versus editing an existing one. Launching from scratch acts as somewhat of a reboot, allowing your new campaign to go through our exploration phase with its new targeting parameters to generate its own learnings.
Don’t worry – creating a new campaign doesn’t mean you have to start from scratch! By using our Duplicate Campaign feature, you can replicate your existing campaign’s content to maintain CPC adjustments and blocks. You’ll get the benefits of creating a new campaign without the hassle of re-entering existing information. Just be sure to make the necessary tweaks before launching!
6. When to Modify Your CPC
As a marketer, maximizing your ROI and getting the most out of your bid strategy is key.
Knowing when to adjust your bid is an essential factor in maximizing your performance. Please note, if you’re using CBS (excluding Semi Manual mode) or EBS (excluding Clicks mode), our platform will auto-adjust your CPC accordingly.
If you are using CBS Semi Manual or EBS Clicks mode, here is a best-practice-based guideline to adjust your CPC:
After your campaign has been live for 3-4 days and your budget starts capping each day, you can begin to gradually lower your CPC by no more than 10% at a time to stretch your original budget. Only lower your CPC once a day to ensure the process is gradual.
7. Test Multiple Creative Variations
We recommend including 5-6 title and image variations (depending on budget). Providing multiple creative options will enable our platform to test and learn, ultimately optimizing toward the best-performing ads and boosting your overall CTR.
You can easily create multiple ad variations with Outbrain’s AI-driven title and image generator. The Content Generator tool is designed to help you create and test ad titles for your target audience with just the click of a button, boosting CTR and overall campaign performance with minimal effort.
Advanced personalization options can help make your ad titles even more relevant and compelling. Define the tone of voice, gender, and age group, and optionally include dynamic parameters for different ads and campaigns.
8. One URL Per Campaign is Key
We recommended using just one clickthrough URL per campaign. This gives each URL a fair opportunity to excel as our algorithms progressively determine which ones perform the best across our network.
9. Timing is Everything
All ads submitted are thoroughly reviewed by our internal Content Review team to ensure it meets our quality standards and Advertising Guidelines. We recommend submitting your campaign one week before your expected launch date as a precautionary measure to give our team ample time to review and leave yourself a window to make any necessary edits.
Pausing your campaign prior to its review will halt the review process altogether. So if you’re proactively scheduling a campaign to launch on a future date, be sure to leave your content in its On/Active state until you get confirmation that it was reviewed.
10. Keep Calm and Launch Your Outbrain Campaign
Take a deep breath and remember: Outbrain is incredibly dynamic and lets you stay in control directly from your dashboard.
If you’re having any issues with your launch, reach out to our Customer Success team – they’re willing and ready to assist you.
Want more helpful tips for becoming an Outbrain expert? Check out the Outbrain Dashboard Demo webinar recording, and watch whenever you like.