
3 Google Analytics Hacks to Optimize and Measure Your Outbrain Campaigns

If you are reading this, you’ve probably already launched more than a few campaigns with Outbrain. You checked off all the “best practice” boxes and you’ve checked out our performance hacks blog series, parts one, two and three. You know your winning mix of headlines and images and you’ve implemented the Outbrain pixel. Congratulations! You are an Outbrain advertising pro!
And as a pro, you’re definitely working with a web analytics tracking tool, which provides you with important audience engagement data to help inform any and all adjustments you make on your campaigns. When paired with the data available through the Outbrain dashboard, you’ll be able to gain a 360-degree perspective of how your campaign is performing. Google Analytics is the most common web analytics tool in the industry, so we’ll focus on it here. But feel free to apply these practices to whichever platform you choose to work with.
First things first. In order for these hacks to work, you must use UTMs in your tracking code. We recommend using the following code in campaigns you launch with Outbrain:
utm_medium=discovery&utm_source=outbrain&utm_content={{ad_title}}&utm_campaign=[Your_campaign_name]&utm_term={{section_name}}
The UTM string should be implemented in the tracking section of your Campaign Settings, and we’ll automatically append it to every URL uploaded to the campaign. Just be sure to swap out [your campaign name] with the name of your Outbrain campaign.
Second, you need to link your Google Analytics and Google Ads account. Here’s a walkthrough from Google on how to do it.
Now, down to business: here are three advanced Google Analytics hacks to help you power up your Outbrain Amplify campaigns:
- Outbrain + Remarketing lists for search ads (RLSA): Increase value from long-tail keyword bids
- Paid brand search campaigns and RLSA lift
- Google Analytics dashboards
Hack #1: Outbrain + Remarketing lists for search ads (RLSA) – Increase value from long-tail keyword bids
You may want to target people who are searching for long-tail keywords that are a good fit for your business – but these are often expensive, and you’re not willing to bid on them. However, there’s a more cost-effective way, and it involves the remarketing lists for search ads (RLSA) feature available in Google Ads. Create unique audience lists in your Google Analytics account, composed of visitors to your website who landed via your Outbrain Amplify campaigns only. By combining Amplify traffic with your RLSA campaigns, you can better tailor your long-tail keyword search ads to target a more qualified audience. When used well, RLSAs can result in a more efficient use of ad spend, better conversion rates and, ultimately, better ROI.
Here are the steps to perform this hack:
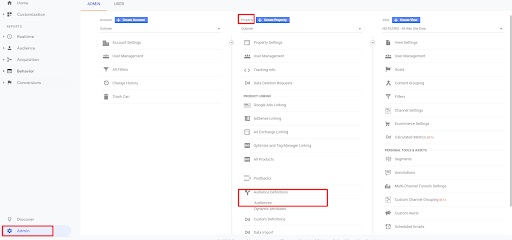
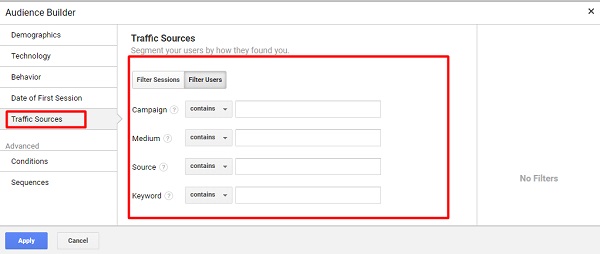
a. Create the audience. Go to your GA account>Admin> Property>Audience definitions>New audience>Traffic sources. You can choose to create audiences by the utm medium, source, campaign – separately or all together, depending on your scale in the Outbrain network.
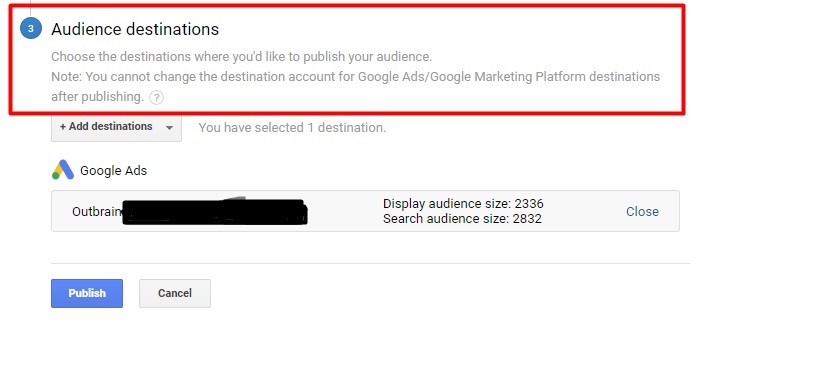
b. Once you have created your audiences, share it with the linked Google Ads account.
c. Now you can opt in this audience to your existing long tail kw campaigns or new campaigns, and choose one of the below action items:
- Optimize bids for your existing keywords and campaigns for visitors on your remarketing lists. For example, you can increase your bid by 25% for those who visited your website via an Outbrain Amplify campaign in the past 30 days. Or you could show a different ad to site visitors who have read a specific piece of content on your Outbrain Amplify campaigns.
- Bid on keywords that you don’t normally bid on specifically for people who have recently clicked on your Outbrain Amplify campaigns. This can help increase your conversion rate. For example, you could bid on broader keywords just for people who previously visited your site from an Outbrain campaign.
Of course, these are only two ideas about how to use this audience. You can get very creative with these RLSA lists! The best way to utilize them in your RLSA strategy will depend on your product and offering.
Hack #2: Search Brand Ad Campaigns and RLSA lift
With this hack, you can report on what happens after your readers have engaged with your article promoted by Outbrain – how many then search for your brand keyword and reach your Google Ads campaign as a result. Measure this data point, and then use it to improve brand awareness via your Outbrain Amplify campaigns.
How? Follow these steps:
a. Create the audiences in GA and share them with the respective Google Ads account, like we did in the previous hack.
b. Add an audience to your Google Ads campaign. Here is information from Google about how to do it.
c. Opt in this audience to your search brand campaign audiences in Google Ads. Add the audience, and under Targeting Setting, select either Observation (viewable data only, with no bidding or reduced reach) or Targeting.
d. Once the data has been gathered, create a report in Google Ads based on this audience, your search brand campaigns, and your conversions. See the performance of the audience who had an initial touchpoint via Outbrain, and then came back, searched for the brand/product and converted within the defined attribution window in Google Ads.
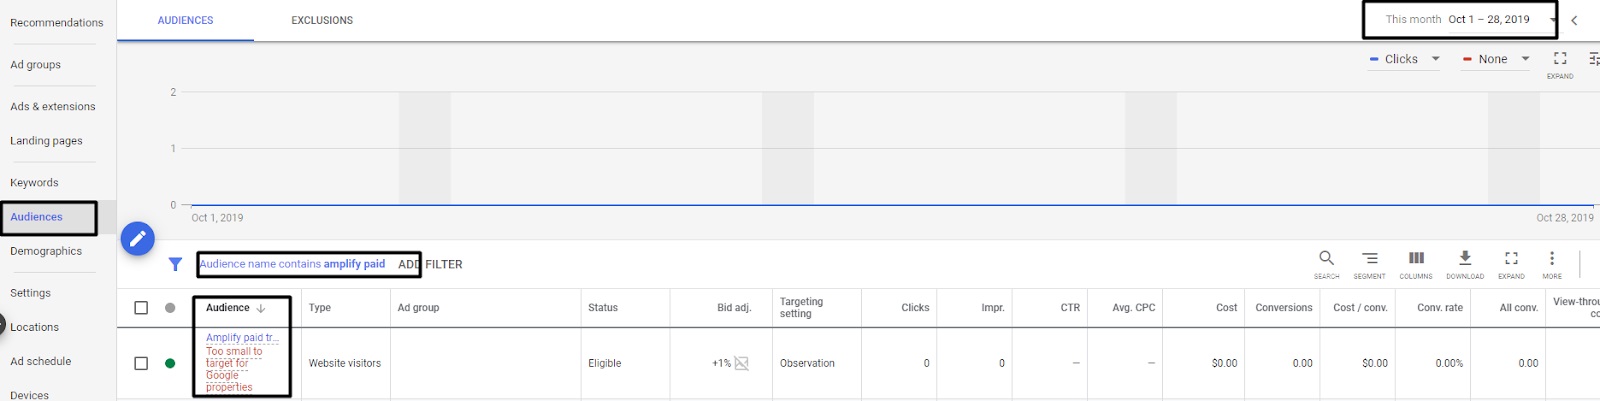
- If you are not familiar with Google Ads reporting, there are a few ways to view this report. Here is the quickest one: dive into the campaign view in Google Ads, click “Audience” in the sidebar menu, filter by the audience name, select the time window, and add the columns you want to report by.
Hack #3: Google Analytics dashboards
Lastly, Google Analytics dashboards will help you monitor your campaigns with all the relevant GA data in one place. There are two templates:
- Performance
- Engagement
You’ll want to use the one that aligns best with your goal. If you’re looking to drive conversions (purchases, subscriptions, or lead generation), use the Performance template. If you’re optimizing for engagement (page views or time spent on page), download the Engagement template.
The first column, regardless of the goal you’ve selected, will show you high-level analytics. It provides a visual on Outbrain traffic volumes but also lends some insight into how the traffic is performing. As we move across columns, you’ll see the data drill down to the campaign level, showing you how each campaign is performing both engagement-wise and conversion-wise. Is there a particular campaign that is outshining the rest? You may want to consider putting more resources behind it.
Next, you can see performance by traffic source. This will allow you to make specific choices based on engagement levels in the traffic brought in by each publisher section. The source names here will correlate with the ones you see populated in “By Section” under the Campaigns tab in your Amplify dashboard.
Finally, drill down to the headline-level. This section complements the “By Content” view under the Campaigns tab in your Amplify dashboard. How are your headlines performing? Take note of the keywords and phrases in the top-performing headlines as you’ll want to work these into future headlines. Additionally, you should consider pausing headlines that are driving high volumes of traffic with a low conversion rate.
These dashboards should serve as the optimization guideposts for your Outbrain campaigns.
Hope you find these three hacks valuable for you! Got more cool hacks to share? Hit me with them in the comments below.