4 Amplify Tips and Best Practices for Owned Content


Content discovery via Outbrain network of the world’s most premier publishers can be a highly effective way to drive new, unique, and engaged visitors to your content. However, as you consider what content to amplify, it is important to first distinguish between your owned and earned content.
This is something that might not occur to you when you are first setting up your campaign. However, we always recommend separate campaigns for owned and earned media so it is easier to track the performance for each of these different paths and determine the appropriate CPC to adjust to.
On your own site, you can track the performance of time on site, page views per session, and bounce rate with Google Analytics. However, you cannot track earned performance after a user clicks, as the code isn’t yours. So, while earned can be quite powerful in its own right, you have more opportunity to measure, optimize, and improve the performance of your owned content.
Having said that, here are a few tips and best practices on how to measure your Amplify owned content campaigns.
1. UTM Tags
There are many traffic sources to your site as you can see under “acquisition” in Google Analytics. When analyzing the performance of your Outbrain content, you’ll sometimes want to see the traffic sources in a resolution that Google Analytics does not support by default.
Therefore, it is highly recommended that you also add UTM tags to each campaign. This way you will be able to better optimize your campaign and also compare the performance between several campaigns according to the UTM parameters.
UTM parameters are simply tags you add to a URL — when someone clicks on your link, the tags are sent back to Google Analytics and are tracked.
The three must and most important UTMs are:
- Utm_source: Identify the traffic source. (For example, is your source your newsletter, Facebook, or Outbrain?)
- Utm_medium: Identify the medium or the way the content was promoted. (For example, banner, email, or CPC.)
- Utm_campaign: Identify the specific campaign or product promoted.
If you use these terms in an organized manner and maintain name conventions, you will be able to easily track your data and compare the performance by campaign, by source, by media type (medium), or a combination of the last two.
It is important to note that UTM parameters are case sensitive.
You can use Google URL builder to generate these parameters.
For example, take a brand that’s promoting two separate pieces of content in two different campaigns via different channels (i.e. Facebook, Google, and Outbrain.) They pay per click for each campaign.
If they set up UTMs using the same medium name and same campaign name with a different source name, they have the option to compare the performance of each traffic source for both campaigns. Additionally, they can also compare the data for Campaign A vs. B, no matter the traffic source. They can also compare per source and campaign for all paid traffic channels as well. The tagging gives you the option to analyze the data in a number of different and helpful ways, so you can accurately make improvements.
2. Traffic source within a campaign
When promoting content via discovery platforms, you may want to deep dive into the traffic sources within each platform. This data may be useful when looking for site engagement and conversions.
|
|
In Outbrain, for example, you can simply add another UTM to the promoted link which is UTM_term: utm_term={{origsrcid}}
The data appears under Acquisition; all traffic; Source / Medium / keyword. You can find a more in-depth explanation here.
The data collected by this UTM, will enable you to identify the top-performing and under-performing referring sources and optimize your campaign accordingly.
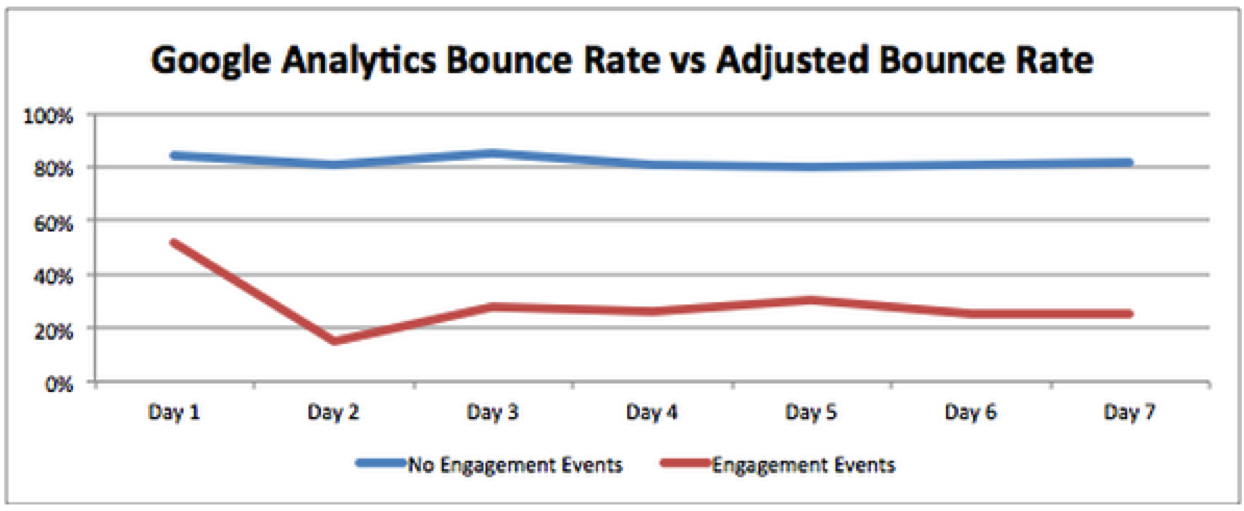
3. Bounce rate
The Bounce Rate is the percentage of entrances to your site based on only one page view. It doesn’t take into account how much time the reader has actually spent on the landing page. In other words, if the reader did not take a next step (an event or page view), Google counts it as a bounce.
However, a high bounce rate does not always indicate a problem.
Deeper analysis is often required to interpret the bounce rate accurately. For example, did the visitor find what they were looking for and stay on the page for a long time? Or were they disappointed and immediately closed the page?
There are cases where the landing page contains a lot of content and a long stay on the same page indicates that the reader is interested in the content.
If you distinguish between the cases when a visitor is engaged with the content versus immediately closing the page, you will get more insight into the bounce rate.
A good way to measure this is to automatically trigger an event when readers stay for a minimum amount of time. You can find more information on this topic here.
If you want the readers to be more engaged with your site you should analyze the data according to bounce rate and the number of page views per session in the below ways:
- Which content leads a visitor to consume more pages on the site and which leads to a high bounce rate.
- Does the landing page offer a visitor the option to continue and engage with the site?
- Does the landing page lead to additional pages on the website?
- Does it have other actions that can be measured?
- Does it have a navigation?
- Does it have a widget of recommendations?
- Does the landing page lead to a call to action?
- To an affiliate page? In this case, the next page doesn’t necessary will have the Google Analytics code and, as a result, it will count as a bounce.
- If measuring desktop performance, what does the page communicate above the fold?
- What traffic sources lead to a high bounce rate? Focus on the sources that get the best results. (See also the previous point).
4. Landing page
You can also investigate your owned campaign’s performance by checking the landing page (Acquisition; social; landing page). This is the page the reader landed on when entering your site. Check whether there is a page which drags your results down and optimize accordingly.
If you are promoting various items for a single URL, you can use UTM_content parameter to differentiate between them.
In this case, you will need to add another dimension for each report to check the data:
Acquisition; Ad Content – add another dimension – Other → Acquisition —> Ad Content
Key Takeaways
Measurement and proper analysis is key to success with Outbrain Amplify. As a best practice, remember to set up separate campaigns for your earned and owned content. Additionally, for owned content, remember to set up UTM parameters to identify traffic sources to your site and traffic sources within your campaign.
Investigating and analyzing your bounce rate is also hugely important, as a high bounce rate may not be all that it seems. Additionally, so is proper analysis of your landing page’s performance.
I hope these tips and best practices help you with your next Outbrain campaign. If you are interested in more tips, you can always check out our Outbrain Help Center as well.